
Join Our Community
Sign up for Club TWiT and get all of our podcasts ad-free, member-exclusive shows, the TWiT+ bonus feed, and access to our members-only Discord community. Join Now! Plus we offer family & corporate plans too.

Current threats, risks, and tech breaches everyone is facing in security
Security Now could be the most important show you watch all week. Security guru Steve Gibson guides us through the minefield of ransomware, viruses, cyber espionage, hacking, etc.

Top journalists & experts breaking this week's tech news
Tech News Weekly brings you interviews from tech journalists who make or break the top stories of the week. Get an in-depth look at the fast-paced world of technology and how it is changing our lives. Subscribe today!

Advertise on TWiT.tv
TWiT's host-read ads stand out. Connect with our highly engaged, affluent, tech-savvy audience today.

Big Tech with an emphasis on all the giants – not just Google.
Get a big-picture view and detailed analysis of tech topics covering everything you can google. Join This Week in Google as they cover policies, emerging tech, global impacts, and what it all means to individuals and communities.

Your window into Microsoft
Take a deep-dive into all things Microsoft. Windows Weekly delivers sharp commentary and nuanced discussions on Microsoft's new hardware, software, services, enterprise, planned launches, and insider information.

What is TWiT?
The #1 source for tech news, reviews, and info you need to use technology today. See our full list of podcasts.

This Week in Tech
Join Leo Laporte and an ever-changing panel of experts as they discuss the who, what, and why of tech news on TWiT's flagship podcast.

TWiT is Carbon Neutral!
Join us in fighting climate change. Read how we are taking steps to be carbon neutral on the Inside TWiT blog.


All TWiT.tv Shows
Leo Laporte brings some of the most interesting personalities in technology together to talk about the most important issues. Fun, relaxed, informative and always entertaining, count on TWiT for the best tech podcasts in the world.
Subscribe
This Week in Tech
This Week in Tech is the top-ranked flagship tech podcast from TWiT.tv. Every Sunday, Leo Laporte and a roundtable of insiders explore the week's hottest tech news from AI to robots, and PCs to privacy. When it comes to tech, TWiT is IT.
Subscribe
Security Now
Cybersecurity guru Steve Gibson joins Leo Laporte every Tuesday. Steve and Leo break down the latest cybercrime and hacking stories, offering a deep understanding of what's happening and how to protect yourself and your business. Security Now is a must listen for security professionals every week.
Subscribe
MacBreak Weekly
MacBreak Weekly covers all things Apple: Leo, Andy Ihnatko, Alex Lindsay, and Jason Snell analyze every bit of news from the most interesting company in tech. From AI to Vision Pro, iPad to iPhone, these Apple experts know-all and tell-all.
Subscribe
Windows Weekly
Windows Weekly is about more than Windows. Veteran Microsoft insiders Paul Thurrott and Richard Campbell join Leo for a deep dive into the most valuable company in the world. From consumer to enterprise, AI to Xbox, Windows Weekly is the only Microsoft podcast you'll ever need.
Subscribe
This Week in Google
It's not just Google. This Week in Google hosts, Leo Laporte, Jeff Jarvis, and Paris Martineau, cover all of Big Tech every Wednesday. Listeners tune in for thought-provoking and entertaining conversations about AI, Internet memes, the future of media, and the latest emerging tech. You won't want to miss a minute.
Subscribe
Tech News Weekly
Industry expert Mikah Sargent, brings you interviews from tech journalists who make or break the top stories of the week. Get the freshest perspective and in depth insight into the fast-paced world of technology from Tech News Weekly.
Subscribe
Ask The Tech Guys
Tech experts Leo Laporte and Mikah Sargent have the expertise to help you get the most out of your technology. From the latest gadgets to tried-and-true tech tips, tune into Ask The Tech Guys for an informative and fun look at tech.
Call in with your live questions from 11 am-2 pm PT every Sunday at call.twit.tv. Get ready to level up your tech game!
Subscribe
iOS Today
Join Rosemary Orchard and Mikah Sargent for iOS Today, TWiT.tv's podcast for all things iPhone, iPad, Apple Watch, Apple TV, and more! From app reviews to helpful tips and tricks, from the latest news to the coolest accessories, Rosemary and Mikah will help you make the most of all your iOS devices.
You can join Club TWiT for $7 a month and get ad-free audio and video feeds for all our shows plus everything else the club offers...or get just this podcast ad-free for $2.99 a month.
Subscribe
This Week in Space
The new space age is upon us, and This Week in Space leaves no topic untouched. Every Friday, join Editor-in-Chief of Ad Astra magazine, Rod Pyle and Managing Editor of Space.com, Tariq Malik as they explore everything related to the cosmos.
Subscribe
Home Theater Geeks
Get the most out of your home theater with the latest advances, product reviews, and all things audio and video. Every Thursday, Scott Wilkinson shares his expertise, energy, and enthusiasm about how to make your A/V system sound and look its best. In this short-format podcast, Scott brings you news, reviews, interviews, and commentary, and answers your questions.
You can join Club TWiT for $7 a month and get ad-free audio and video feeds for all our shows plus everything else the club offers...or get just this podcast ad-free for $2.99 a month.
Subscribe
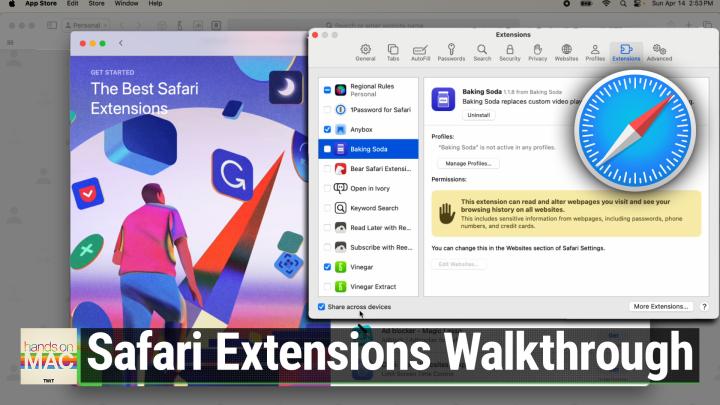
Hands-On Mac
Hands-On Mac explores and explains the Mac — and beyond! From clever Terminal commands to little-known iOS settings, Mikah Sargent shares all the best tips and tricks for your Mac, iPad, iPhone, and Apple Watch. You'll get all the details on Apple's apps and the best apps in the App Store, you'll learn about awesome accessories for your Apple devices, and you'll explore updates to Apple's operating systems — including iOS, macOS, iPadOS, and watchOS. Hands-On Mac is your one-stop shop for Apple know-how.
You can join Club TWiT for $7 a month and get ad-free audio and video feeds for all our shows plus everything else the club offers...or get just this podcast ad-free for $2.99 a month.
Subscribe
Hands-On Windows
Hands-On Windows, featuring Paul Thurrott, will help you adapt to the changes made in Windows 11. From visual tweaks to performance boosts Hands-On Windows will show you how to get the most out of your Windows 11 PC.
You can join Club TWiT for $7 a month and get ad-free audio and video feeds for all our shows plus everything else the club offers...or get just this podcast ad-free for $2.99 a month.
Subscribe
Hands-On Tech
Hands-On Tech is where you'll find hands-on reviews, previews, and unboxings of the hottest tech gadgets like the latest smartphones, notebooks, wearables, smart home devices, and more; featuring Leo Laporte, Mikah Sargent, and other TWiT friends.
You can join Club TWiT for $7 a month and get ad-free audio and video feeds for Hands-On Tech and all our shows plus everything else the club offers.
Subscribe
Untitled Linux Show
The Untitled Linux Show covers the week's hottest Linux news for desktop, gaming, and even enterprise. ULS is the weekly update you don't want to miss, from the latest kernel development to the updates on your favorite apps! Each episode finishes with a killer command line tip from each host.
You can join Club TWiT for $7 a month and get ad-free audio and video feeds for Untitled Linux Show and all our shows plus everything else the club offers...or get just this podcast ad-free for $2.99 a month.
Subscribe
Host-Read Ads
Navigating the podcast sales process can be cumbersome because every podcaster has their own unique approach. Join Lisa Laporte, the CEO of TWiT.tv, each Friday to learn about the different types of podcast advertising, how they work, and what you need to consider when buying podcasts. If you are new to the podcasting space or a brand wanting to advertise in podcasts, then subscribe to learn more.
Subscribe
TWiT News
When tech news breaks, we cover it. On this podcast, you'll get the latest product announcements from all the tech giants, plus breaking tech news as it happens. Join Leo Laporte, Mikah Sargent, and other experts on the TWiT News podcast.
Subscribe
TWiT Events
TWiT Events is your window to the best tech events in the world. Whether it's the hottest announcements from CES or the latest security tech, TWiT Events is there.
Subscribe
Total Leo
A compendium of podcasts from the Chief TWiT, Leo Laporte. This feed includes all of Leo's audio or video releases and sometimes includes his appearances on other podcasts. One feed to serve them all.
Subscribe
Total Mikah
A compilation of podcasts from TWiT.tv host, Mikah Sargent. Subscribe to this feed to get access to all the TWiT.tv audio and video episodes featuring Mikah.
Subscribe


About TWiT Tech Podcasts
Covering the latest technology developments since 2005, TWiT.tv (This Week in Tech) has the unique distinction of being one of the world's first all-tech podcast networks. We are known for our expert analysis, unfiltered opinions, and fearless podcast hosts. Get breaking tech news, future trends, security and privacy, political and regulatory developments all wrapped into fast-paced, informative, and entertaining podcast episodes. Plus, you'll get tech reviews, recommendations, tips, and how-tos from the very best in the industry.
Founded by Leo Laporte and based near the heart of Silicon Valley in Northern California, our network is the home of our original tech podcasts of the geeks, by the geeks, for the geeks. Check out the full list of podcasts here and subscribe. There you will find tech podcasts for Android lovers, Apple and iPhone enthusiasts, and Enterprise IT pros. Listen to our podcasts on Windows deep-dives, cybersecurity, IoT, open-source, and Google. Also, get reviews on smartphones and laptops, recommendations on the best apps, plus help and how-tos with your tech questions. As an independent media source specializing in tech, our programs are informative, honest, engaging, provocative, and cater to the tech enthusiast. Our shows are available in audio and video.
TWiT's technology programming
Our programming delivers tech news podcasts, live streams, and YouTube videos with expert insight, reviews, and analysis of all matters tech. Knowledgeable, opinionated, and always entertaining, our network is committed to comprehensive coverage of the tech world.
Anchored by Leo Laporte's long-running series This Week in Tech, our lineup features a diverse set of journalists and experts who specialize in different subjects and niches of the tech industry. Our podcasters provide unique insight based on unparalleled experience in the tech field.
With fresh content daily, our network always has something new for the listener. Our weekly podcasts feature animated discussions and sharp analysis about the latest tech developments, products, and gadgets, including our acclaimed weekly roundtable of tech journalism's most informed writers and reporters.
Our live stream provides on-the-spot coverage of breaking news and takes you behind-the-scenes into our studio while we record new episodes.
TWiT.tv's lineup includes several nationally acclaimed and popular podcasts:
- This Week in Tech - Our flagship program with founder Leo Laporte features analysis and commentary from tech experts and journalists in a roundtable discussion of current news and trends and niche topics in the tech industry.
- Security Now - Steve Gibson, security expert and the inventor of the first anti-spyware program, sits down with Leo every week to discuss the latest cybersecurity threats and how to stay safe.
- MacBreak Weekly - Leo, Andy Ihnatko, Alex Lindsay, and Jason Snell break down the latest developments from Apple. From new iPhones, laptops and Macs, to new services, Apple Silicon chips, and insider reports, no Apple topic is left unturned.
- Windows Weekly - Veteran Microsoft insiders Paul Thurrott and Richard Campbell join Leo for a weekly look at Windows, Xbox, Office, Azure, and everything else Redmond has to offer.
- This Week in Google - Jeff Jarvis, Paris Martineau, and Leo talk about the latest trends in Internet search, cloud computing, and products from one of tech's most influential companies. They also examine the state of technology journalism, social media ethics, tech-related policies, and politics, and more.
- Ask The Tech Guys - Tech experts Leo Laporte and Mikah Sargent team up to answer all of your burning tech questions. From the latest gadgets to tried-and-true tech tips, Leo & Mikah have the knowledge and expertise to help you get the most out of your technology.
- Tech News Weekly - Hosted by Mikah Sargent, Tech News Weekly takes an in-depth look at some of the week's biggest and most important tech news. The podcast features interviews with tech journalists and experts breaking or making the news worldwide.
- This Week in Space - Every Friday we take a deep dive into a fascinating topic. What’s happening with the new race to the moon and other planets? When will SpaceX or NASA really send people to Mars?
With a non-stop flow of new episodes and our deep catalog of shows available for download, you'll always find something new to watch, hear, and learn on the TWiT.tv podcast network.
Why follow TWiT?
Experience. Leo Laporte's original This Week in Tech is one of the very first podcasts dedicated to all things tech. At TWiT.tv, we gather some of the most knowledgeable experts and journalists to dive deep into tech news and trends, including the newest innovations and developments, the business of tech, privacy, geopolitics, policies, and ethics related to tech. Our podcasts offer a lineup of diverse pundits you won't find in any other single source.
Independence. We're a fully independent podcast network. TWiT.tv is completely free of editorial influence from corporate or business interests, large or small. That freedom lets us cover the tech world without bias or distortion — and makes us unafraid to cover controversial, hot-button topics with honesty and candor.
Variety. Innovation in technology happens by the hour. No other business sector has as many different branches, companies, or thought-leaders. At TWiT.tv, we cover them all. With at least one podcast for every major topic in tech, you're sure to find at least one show on our network that matches your interests.
Knowledge. As technology's reach continues to grow, tech sector workers and consumers alike need all the information they can get to keep up with the latest developments. Our shows keep you fully updated on tech. We empower you with information to make decisions, demystify the most complex topics, and help you take advantage of all that the future of tech has to offer.
Subscribing to TWiT.tv
All of our programming is available on-demand for free any time, day or night, on all the major podcatchers like Apple Podcasts, Spotify, Pocket Casts, Player FM, and more.
Subscribing to our podcasts is the simplest way to make sure you receive all the latest news. You'll get the newest episodes directly on your smartphone, tablet, laptop, or desktop. Each show is available in audio and video formats.
- From the website: All episodes and live streams are viewable straight from our website. Go to the page for the podcast that you want, and you'll see a "subscribe" button that takes you to all the options for video and audio podcasts.
- Podcatchers: Search for TWiT.tv shows on any of the popular podcast platforms: Apple Podcasts, Spotify, TuneIn, iHeartRadio, Overcast, and more. Each service will send you updates when a new episode goes live.
- RSS feeds and links: We offer syndication feeds for both video and audio of all our shows on our subscribe page. Just copy and paste the URLs into your preferred podcatcher.
If you want to get your podcasts ad-free and also unlock access to exclusive content, consider joining Club TWiT where for only $7 per month, you can get ad-free podcasts, exclusive content, and access to our private Discord server.
Tech Podcasts
See the full list of TWiT Tech Podcasts
Current ShowsHow to listen
Advertise on TWIT.tv
Hosts


TWIT.tv Store

Check out the latest shirts, hats and gear at twit.tv/store